

I’ve talked about this before–the minis I use for my table.
I had the same problems most DMs find themselves having when they want miniature-based (or grid-based) combat… minis themselves. They’re a nexus of three major conflicts:
- Reference – we want miniatures that can be used in the place of monsters and players in a way that makes it easy to know what the heck they are. That old box of half-painted Warhammer figures and some random Bones minis, etc. is a disappointment because, end of the day, you end up having to say “that wolf there, that’s the hellhound; yeah, and that blue guy? he’s the Helmed Horror; and that giant is a dragon”. Proxies (objects used to represent things) are a legit way of doing it all, but even then, random proxies are terrible (“I shoot at the hobgoblin!”…”Which one?”…”the d20 over there by Bill; no that one… no THAT one”).
- Quality – Paper miniatures can be alright, but they’re fragile. Cheap minis rip and break and it’s just no fun. Flimsy plastic warps. In the end, we want something with a little table weight, something durable, something consistent, and useful. Quality.
- Cost – Sure… if we had an unlimited budget, then an unlimited inventory of well painted monsters of all kinds could be at hand. But, that’s not practical, it’s not cheap. We would love to be in and out of the mini market for under $100 (many of us) and under $50 (if we’re lucky).
So, my solution was to take a note or two from other games.
First, I made the decision that for Reference, what I need is the players being able to easily and quickly identify what they’re doing and who to in combat. I needed easy ways of tracking things. Everything else was window dressing. The point of the combat wasn’t to recreate a historically or scaled accurate battle, it was to make battle easy to navigate.
Second, I thought about the playability of poker chips. The heavy clay ones. How good they feel in hand, how well they slide on speed cloth. Poker chips are a joy because they’re made well, durable, and useful. I wanted minis I didn’t worry about breaking or bending. I wanted minis that could travel in my box as easily as dice.
Third, I figured I was out on buying them and I would need to make them. That required a lot of looking into craft stuff like one might find at a Joann’s or Michael’s store. As I am not a middle aged lady looking for new sewing patterns, twenty-something girl in a mind-numbing masters program hunting for jewelry making stuff, or a guy trying to decorate a wedding reception… I had no experience with the world of crafting.
But, after consulting all three of those people–I had some ideas. I made a first run about a year ago or so, those were my test run. I abused them, banged them up, and they’re still all in exactly the same condition (bit dirtier now though) as before.
Clay miniatures, metal bases, high contrast letters on top… and of different sized.
So, this weekend–after that year and change–I decided to make a new and better set. Taking some more care and learning a few new lessons, they’re phenomenal and I can’t wait to get them on a table.
You can find my previous post on Clay Minis here and see the results… the current run is on this post itself, keep reading.
The new process had a few more steps.
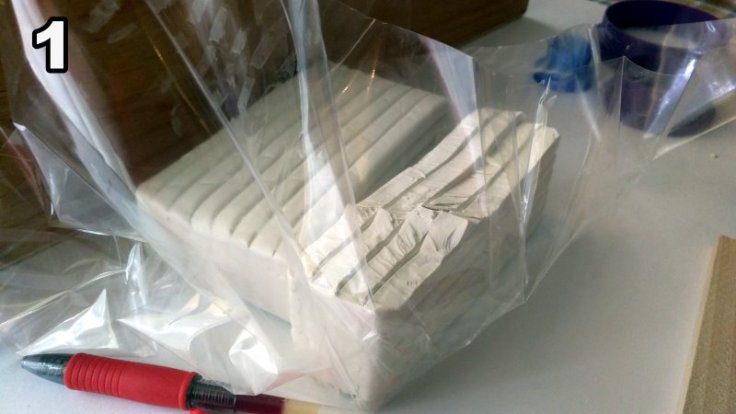
1 – A few good pounds of white clay. Clean space, wear nitrile gloves. For the player tokens, I got different colors of other clay,
2 – With a couple pairs of wood slats (1/4 inch and 1/2 inch) and a pizza dough roller, I could make my new minis with different heights. That was something that disappointed me in the last set… I got the sizes a bit wrong (my Small was too small; my Large wasn’t large enough, and I didn’t actually have a Colossal). This time? I could set a height, roll it out. Perfect thickness rather than doing it by hand entirely like last time.

3 – No more rolling little balls of clay by hand and eye-balling it all. I went on Etsy and found someone that made cookie cutters with a 3d printer. Any size you like. So I asked for 5/8″ (Small), 7/8″ (Medium), 1-3/4″ (Large), 2-3/4″ (Huge), and 3-3/4″ (Colossal) cookie cutters in a circle. It took a few days and they’re economical and perfect. I could make everything the perfect diameter flawlessly.

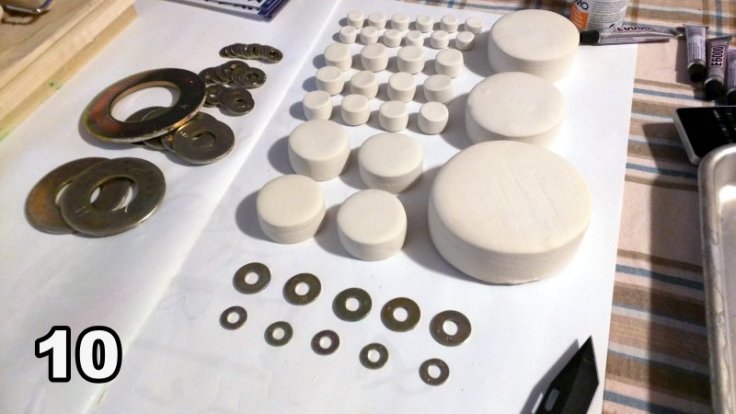
4 – No more random washers. Instead of going to Home Depot for random sizes of washer, I said heck with it and contacted an actual hardware manufacturer. It’s the 21st century, there’s no need to compromise. Not only could I get 100% matching washers (which was just personally nice), but I could get every size I could ever want. I ended up getting 100 small, 100 medium, 50 large, 25 huge, and 5 colossal size (impossible to find locally, I found last year) and all of it way cheaper than buying it from any place here where I live.

5 – Bringing it all together meant I could have perfect height, perfect diameter, and the just right and uniform metal bases. I could have been happier. My first go, I made too many minis and didn’t have all the ones I wanted. It was a compromise of resources. I had only 10 smalls and often would find that just two more would have been perfect. I had 24 mediums and never remember using (in a real combat) more than half of those. I had 8 larges, but never used more than two or three at a time. I had 1 huge, but recall one combat where I needed two. I had 8 player (colored) medium size minis but never needed that many, and they were all medium so I had a disappointment using them to represent Small races. And no colossal. So this time, I said, “be smarter”. A better, efficient, and solid set with no waste. 12 Small NPC, 12 Medium NPC, 4 Large NPC, 2 Huge NPC, 1 Colossal; 5 Medium PC, 5 Small PC. Perfect.
6 – Once I started cutting them and gently smoothing them out, I could tell immediately this was better than my first run. Everything was much more consistent and must cleaner. Cutting the colored clay required cleaning out the cutter so there wouldn’t be little veins of the previous colors in the fresh ones.

7 – The larger sizes were tricky, took more force to get out of the cutter, so more care had to be taken to keep consistent pressure to push them out without tearing them up. In the end, I ended up cutting all the sizes I wanted for my “set”

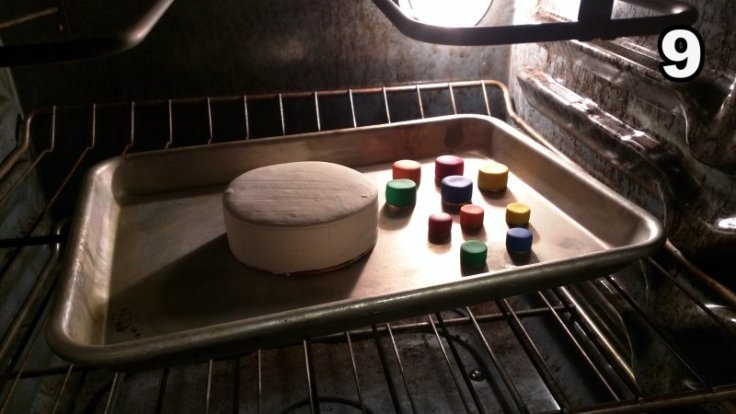
8 – Baking them was straightforward, the larger ones required more time, so I spent about an hour and a half baking. I watched the new Bill Nye Saves the World while working on all this. From start to this point was about two and half hours.

9 – After baking the last of them, I dropped the Green Medium PC from the oven down to the floor… I freaked out… but, it was hard and like my first set, these things are tough. A four and a half foot fall onto a hardwood floor? Not a problem. My first ones took a year of a hell of a beating on purpose. These, I had a plan to up that even higher. So far? These things have Constitution 18.
10 – My last set, I pried off the washers, glued them back on and just called it good. This time, I had a plan to improve the whole quality by leaps and bounds. I wanted to pry off all the washers, sure, but before gluing them on? I wanted to take the NPC washers and paint them black… and the PC washers and paint them white… instead of stamping and filling in the letters, I wanted to use high quality pre-made letters and glue them on… and then glossy shellac the hell out of them for that extra bit of protection from smudges and fingers (my previous ones are dingy from handling, no clear coat), dings and scrapes, and make the metal look better by being colored nicely instead of bare.
11 – When I set up to paint the washers I figured that the white clay is actually more of a “dim white” or “lightly faintly beige white”. It’s clay. It isn’t pure shining white. So, when I painted the PC bottoms white, I decided to hit all the NPCs to make them pop more by basing them whiter, too.

12 – The Results were wonderful. Perfect. Exactly what I wanted.
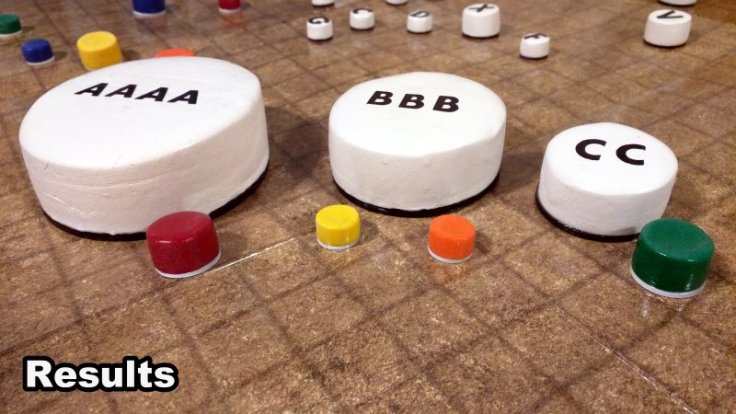
The colors were bright and their bases white and I had two sizes for each of the five colored PC tokens I made. It means Medium and Small races are good to go, and not just that… it means fielding your familiar or animal companion is easy and color matched to you, if you needed such a thing.
Actual lettering was better than my stamp and fill method from before. Clear, brightly contrasted against the white-painted clay. Fantastic.

The black bases were much cleaner looking than the metal showing on the old ones. And the glossy coats of shellac stuff really made a difference. These things don’t feel porous anymore… the old ones did. I worry less about transferance with a little bit of finger oil or marker fluff now. They’re tough as balls, too.
In the end, my set (and the counts) will work perfectly for me. And I have the materials to do another 4 “sets” just like it. I may do that for fun, see who else wants a set for their table.

And, best part, they fit in my DM’s box. Can’t ask for more than that.


I wonder if it would be cheaper to paint the PC colours instead of using coloured clay given how the painted NPC’s came out?
LikeLike
You know, that /would/ be a good bit faster. I might try that, see what kind of quality it turns out like.
LikeLike
So about those cookie cutters…
LikeLike
Oh and since you are using a polymer clay you can use rubbing alcohol to smooth the surface before baking and then use sandpaper to leave it with almost a glass shine *before* the clear coating.
LikeLike
Oh, that’s brilliant… good to note.
LikeLike
https://www.etsy.com/listing/295240257/circle-cookie-cutter-various-sizes
LikeLike
Where did you get the washers from? One of the few sites I found that had all the listed sizes I am looking at ~$220. While that is still cheaper than 280 minis it does seem like a lot.
LikeLike
Almost all from Amazon. Steel Flat Washer, Zinc Yellow Chromate Plated Finish–various sizes.
The big ones? From Fastanal’s site.
LikeLike
What height did you make each of the sizes?
LikeLike
They went up from 1/2″ to 3/4″ to 1″ to 1.25″ to 1.5″ I think… I used 1/4″ thick slats to get an even roll and went up one for each size. After applying bases? That made them about 1/8″ taller each–more or less.
LikeLike
Have you made any kind o condition markers? Since the bottoms are metal, I suppose you could make them magnetic so they’ll stay on easy.
LikeLike
So how much total did all this cost you in the end? Could you provide a list of the costs?
LikeLike